After opening the OrCAD Click on File -> New - > Design. A new design will open. OrCAD automatically gives a name to the design file. Save this file using file -> save as. You may save it in a different directory and a you may give it a different name.
Take a look at the way the left window appears. Under Design Resources, you will find the .dsn ( say design8.dsn). You will click on this before saving the file, generating foot prints.
Next, there is a Folder like button named "SCHEMATIC1". There will be initially one button under it - PAGE1. You can add more pages. These pages will contain the Schematics pages.

* Double click on the PAGE1 under SCHEMATIC1. You will see a blank Schematics, with some Title information on bottom right corner. For this schematics we will be using the components that already exist in the OrCAD library. OrCAD has a number of pre libraries installed.
* Click on Place -> Parts. A "Place Part" window pops up. Check What libraries are already available under Libraries besides Design Caches. For this Design we need the parts that reside in two libraries names connects and discrete. If these are not displayed under Libraries click Add Library. The OrCAD supplied libraries reside in /Program Files/OrCAD/capture/library/. Point to this directory and click on Connector.olb. Also add library named Discrete.olb.
The library Connetor.olb contains the two pin header and the library Discrete.olb contains the diode and the resistor besides many more components.
* Click on the Connector. You will see a lot of components in Part List. Do quickly find a component of our choice write head* in the Part: field and press enter. It will now show a list of parts starting with head. Browse down in the Part List: and click on HEADER 2. Click OK. The 2 Pin Header will be lifted. Take it to an appropriate place in the Schematics and click left to place it.
Repeat the same thing for Diode and the Resistor. They are in the library named "Discrete". Place them at approprite place. Somewhat similar to the schematics you saw in the last page.
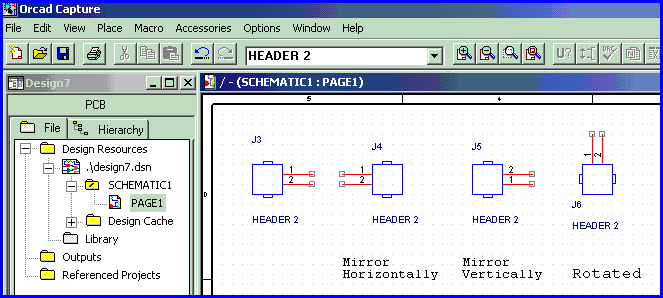
A Component may be changed by right clicking and selecting "Mirror Horizontally", "Mirror Vertically" and "rotate". Left click on the connector and practice these. Place the connector so that it faces the resistor.
In the next few pages we will connect the three components and add power and ground.
Next: Connecting Components
Also:
| file: /Techref/app/orcad_03.htm, 3KB, , updated: 2009/9/29 10:11, local time: 2024/10/18 03:40,
18.224.68.204:LOG IN ©2024 PLEASE DON'T RIP! THIS SITE CLOSES OCT 28, 2024 SO LONG AND THANKS FOR ALL THE FISH!
|
| ©2024 These pages are served without commercial sponsorship. (No popup ads, etc...).Bandwidth abuse increases hosting cost forcing sponsorship or shutdown. This server aggressively defends against automated copying for any reason including offline viewing, duplication, etc... Please respect this requirement and DO NOT RIP THIS SITE. Questions? <A HREF="http://piclist.com/techref/app/orcad_03.htm"> OrCAD, Placing Symbols, Schematic capture, PCB CAD</A> |
| Did you find what you needed? |
|
o List host: MIT, Site host massmind.org, Top posters @none found - Page Editors: James Newton, David Cary, and YOU! * Roman Black of Black Robotics donates from sales of Linistep stepper controller kits. * Ashley Roll of Digital Nemesis donates from sales of RCL-1 RS232 to TTL converters. * Monthly Subscribers: Gregg Rew. on-going support is MOST appreciated! * Contributors: Richard Seriani, Sr. |
|
Ashley Roll has put together a really nice little unit here. Leave off the MAX232 and keep these handy for the few times you need true RS232! |
.